Setting up Kubernetes using Talos and Terraform
Published on Jun 27
For a recent project, I needed a straightforward way to set up a Kubernetes cluster within my vSphere environment. Last year, I used Ansible and CoreOS, which worked well, but required ongoing maintenance. Since then, I’ve discovered Talos, an immutable, API-driven OS for Kubernetes. To focus on speed and immutability this time, I used my current favorite tools: Terraform for infrastructure management, Talos for OS, and Flux for GitOps-based continuous delivery.
Part 1: Talos, a short introduction
Let’s start with the biggest change in my setup: switching from Fedora CoreOS to Talos, a secure, immutable operating system specifically designed for Kubernetes clusters. Previously I was using Fedora CoreOS on which I then installed the necessary tools and bootstrapped the cluster using Ansible. These steps worked fine, but it meant that I had to maintain some playbooks that could get outdated.
This is where Talos brings a big improvement, the OS doesn’t have a shell (or SSH connectivity) anymore. All changes to the OS need to be done via the API, which allows us to provide a configuration and apply it to a node. Besides improving the ease-of-use for standard deployments (things might get more difficult when you want to do fancy custom stuff), it also provides some important security features. It doesn’t have all the bells and whistles a normal OS has, which means that there are fewer possible vulnerabilities. More info regarding the philosophy of Talos can be found here.
Generating machine configurations
Machine configurations define how Talos nodes are set up. Here is an example configuration file:
version: v1alpha1
machine:
  token: "<cluster-token>"
  ca:
    crt: "<ca-cert>"
    key: "<ca-key>"
I generate these configurations for both control plane and worker nodes and pass them to the virtual machines during their creation, ensuring they automatically apply the configurations on boot (otherwise, you would need to apply them after they’ve started up).
data "talos_machine_configuration" "control_plane" {
  for_each = local.control_plane_node_names

  cluster_name     = var.cluster_name
  machine_type     = "controlplane"
  cluster_endpoint = var.cluster_endpoint
  machine_secrets  = talos_machine_secrets.this.machine_secrets

  config_patches = [
    yamlencode({
      machine = {
        install = {
          disk = "/dev/sda"
        }
        network = {
          hostname = each.value
          interfaces = [
            {
              interface = "eth0"
              dhcp      = false
              addresses = ["${cidrhost(var.cluster_network_cidr, var.cluster_network_first_control_plane_hostnum + index(tolist(local.control_plane_node_names), each.value))}/${tonumber(split("/", var.cluster_network_cidr)[1])}"]
              routes = [
                {
                  network = "0.0.0.0/0"
                  gateway = var.cluster_node_network_gateway
                }
              ]
              vip = {
                ip = var.cluster_vip
              }
            }
          ]
          nameservers = var.cluster_node_network_nameservers
        }
      }
      cluster = {
        discovery = {
          enabled = true
          registries = {
            kubernetes = {
              disabled = false
            }
            service = {
              disabled = true
            }
          }
        }
      }
    }),
  ]
}
Part 2: vSphere, creating virtual machines
Time for the real work, setting up the virtual machines. Terraform has a great provider for vSphere allowing you to create virtual machines in no-time.
Data retrieval
Before I actually deploy anything, I need some information regarding the existing infrastructure. For this, I’ve used a combination of variables and data sources.
# Retrieve datacenter information
data "vsphere_datacenter" "this" {
  name = var.vsphere_datacenter
}

# Retrieve host information
data "vsphere_host" "this" {
  name          = var.vsphere_host
  datacenter_id = data.vsphere_datacenter.this.id
}

# Retrieve resource pool information, either based on given resource pool or host
data "vsphere_resource_pool" "this" {
  name          = var.vsphere_resource_pool == "" ? "${var.vsphere_host}/Resources" : var.vsphere_resource_pool
  datacenter_id = data.vsphere_datacenter.this.id
}

# Retrieve information for given datastore
data "vsphere_datastore" "this" {
  name          = var.vsphere_datastore
  datacenter_id = data.vsphere_datacenter.this.id
}

# Retrieve information regarding given network
data "vsphere_network" "this" {
  name          = var.vsphere_network
  datacenter_id = data.vsphere_datacenter.this.id
}
These data blocks are then used to configure the correct ID’s when setting up the virtual machines.
I also use some local variables to dynamically generate the machine names based on a variable defining how many of which type (control plane/worker) are required;
locals {
  control_plane_node_names = toset([for i in range(var.cluster_control_plane_count) : format("%s%d", "${var.cluster_name}-control-plane-", i + 1)])
  worker_node_names        = toset([for i in range(var.cluster_worker_count) : format("%s%d", "${var.cluster_name}-worker-", i + 1)])
}
Control plane nodes
Once all the preparation is done, we can actually set up the virtual machines which will be used for the control planes. For this I use the default example with some tweaks to make it work with Talos.
resource "vsphere_virtual_machine" "control_plane" {
  for_each = local.control_plane_node_names
  name     = each.value
  folder   = "${var.vsphere_datacenter}/vm/${var.cluster_name}"

  datastore_id     = data.vsphere_datastore.this.id
  datacenter_id    = data.vsphere_datacenter.this.id
  host_system_id   = data.vsphere_host.this.id
  resource_pool_id = data.vsphere_resource_pool.this.id

  wait_for_guest_net_timeout = -1

  num_cpus = var.control_plane_cpu
  memory   = var.control_plane_memory

  ovf_deploy {
    remote_ovf_url = "https://github.com/talos-systems/talos/releases/download/v${var.talos_version}/vmware-amd64.ova"
  }

  disk {
    label = "disk0"
    size  = var.control_plane_disk_space
  }

  network_interface {
    network_id = data.vsphere_network.this.id
  }

  enable_disk_uuid = "true"

  extra_config = {
    "guestinfo.talos.config" = base64encode(data.talos_machine_configuration.control_plane[each.value].machine_configuration)
  }

  depends_on = [vsphere_folder.this]

  lifecycle {
    ignore_changes = [
      ept_rvi_mode,
      hv_mode,
      folder,
      disk[0].io_share_count,
      disk[0].thin_provisioned
    ]
  }
}
Looking into the code in detail;
for_each = local.control_plane_node_names: Usingfor_each, I create multiple control plane nodes based on thelocal.control_plane_node_namesvariable that I created before.- Basic configuration: The name, folder, datastore_id, datacenter_id, host_system_id, and resource_pool_id ensure that the VM is correctly placed in the vSphere environment.
wait_for_guest_net_timeout = -1: Since the Talos image doesn’t have VMware tools, there’s no point in waiting for this property.num_cpusandmemory: I wanted to have the option to easily change resources, so I created two variablescontrol_plane_cpuandcontrol_plane_memorywhich set these values.ovf_deploy { ... }: This block just takes the ovf template url and sets it in the virtual machine configuration so that the ovf template is used when starting the virtual machine."guestinfo.talos.config" = ...: this configuration allows us to insert pregenerated Talos configuration into the machine for when it boots.lifecycle { ... }: vSphere changes a couple of parameters when the virtual machines are created/started, I don’t want to change these again when re-running Terraform, so I ignore them here.
Worker nodes
The configuration for worker nodes is very similar to the control plane nodes. However, there are a few key differences:
- Resource allocation: Worker nodes have their own CPU and memory configurations defined by
var.worker_cpuandvar.worker_memory, respectively. - Disk size: The disk size for worker nodes is set using
var.worker_disk_space. - Talos configuration: The Talos configuration for worker nodes is different, so the extra_config section references
data.talos_machine_configuration.worker[each.value].machine_configurationinstead of the control plane configuration.
These changes allow the worker nodes to be configured with appropriate resources and settings for their role in the cluster while keeping the overall structure and logic consistent with the control plane nodes.
Bootstrapping the cluster
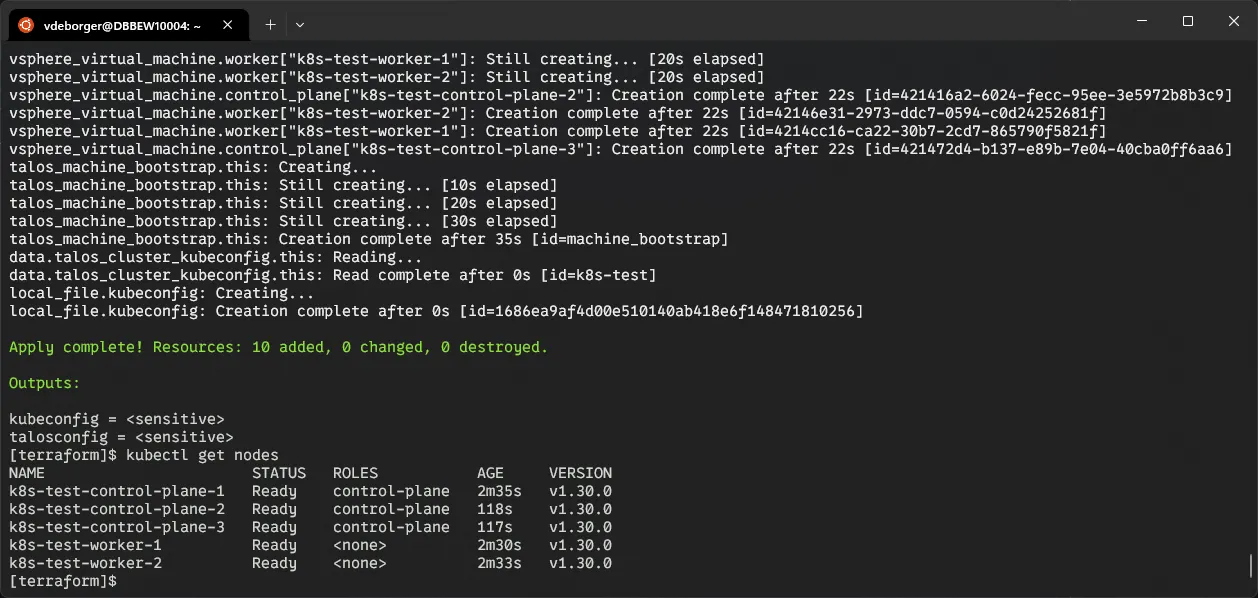
Starting up the machines with the Talos machine configurations, doesn’t mean the cluster is actually created. Once the VMs have started up, they are just independent machines. In Talos, a cluster can be “bootstrapped.” This is a process where all necessary components are configured and started up, making sure that they integrate with eachother.
First, the control plane gets initialized. This includes starting up the core Kubernetes components like etcd, the api server, the scheduler,.. After that, worker nodes are started up and are joined to the cluster.
I’ve also included this process within my Terraform code, so it automatically gets executed when the control plane nodes have started up. I execute this on the first control plane node, but either one of the control plane nodes should work fine.
resource "talos_machine_bootstrap" "this" {
  client_configuration = talos_machine_secrets.this.client_configuration
  endpoint             = cidrhost(var.cluster_network_cidr, var.cluster_network_first_control_plane_hostnum) # Selects the first control plane in the given configuration
  node                 = cidrhost(var.cluster_network_cidr, var.cluster_network_first_control_plane_hostnum) # Selects the first control plane in the given configuration
  depends_on = [
    vsphere_virtual_machine.control_plane,
  ]
}
Once the cluster has been set up, accessing it is pretty straightforward. I’ve utilized the local_file resource to export the kubeconfig (and talosconfig) file to the Terraform directory so I can use it with kubectl.
resource "local_file" "kubeconfig" {
  content  = data.talos_cluster_kubeconfig.this.kubeconfig_raw
  filename = "kubeconfig"
}

resource "local_file" "talosconfig" {
  content  = data.talos_client_configuration.this.talos_config
  filename = "talosconfig"
}
Part 3: Flux, Kubernetes resources the GitOps way
While working with infrastructure-as-code, I want to be able to define as much as possible declaritively. I don’t want to have an issues with different tool versions (e.g. kubectl or helm) or helm chart/repo versions. That is why I am currently integrating Flux in all of my clusters, just like the ones set up using this template.
What the Flux?!
Flux is a powerful tool for continuous delivery (CD) in Kubernetes, enabling GitOps workflows by ensuring that the cluster state matches the configuration in a Git repository. It automates the deployment process of Kubernetes resources by monitoring and applying changes from the Git repository. By doing this, Flux provides a single source of truth for Kubernetes infrastructure, which utilizes version control. All of that is the basis of the GitOps principal that Flux embraces.
Integrating Flux into the cluster
Usually, when you want to install Flux in your cluster, you’d need to execute the flux bootstrap command. That one will then - with some arguments - generate some Kubernetes manifests, commit them to the given Git repository and then apply them. One of the resources that is deployed is the source controller, which is in charge of watching the Git repository and detecting when there are changes. Based on these changes, the Kustomize or Helm controller gets activated and your resources get created.
I’m taking a little different approach. Since I was already using Terraform, I integrated the Flux bootstrap process into my Terraform code. Here’s an example of how I configured the Flux provider:
provider "flux" {
  kubernetes = {
    config_path = "${path.module}/kubeconfig"
  }
  git = {
    url = "https://github.com/DB-Vincent/some-very-cool-repository-here"
    http = {
      username = "git"
      password = "an-access-token-i-created-for-flux"
    }
  }
}
After that, I added two resources to my existing Terraform configuration; one (time_sleep.wait_30_seconds) to wait a little while so that the cluster could start up and the other (flux_bootstrap_git.this) to bootstrap the cluster.
resource "time_sleep" "wait_30_seconds" {
  create_duration = "30s"

  depends_on = [
    talos_machine_bootstrap.this,
  ]
}

resource "flux_bootstrap_git" "this" {
  embedded_manifests = true
  path               = "clusters/${var.cluster_name}"

  depends_on = [
    time_sleep.wait_30_seconds,
    local_file.kubeconfig
  ]
}
Once the bootstrapping process is finished, Flux will have created a couple of files in the given repository. These files are the basis for the Flux deployment. They set up the necessary components and ensure that Flux can synchronize changes.
clusters
└── my-cool-cluster
    └── flux-system
        ├── gotk-components.yaml
        ├── gotk-sync.yaml
        └── kustomization.yaml
Adding an application
While Flux deserves a detailed post on its own (a couple of guides available on Flux’ documentation), here’s a brief example of how to add an application. I created a simple manifest to create the Kubernetes namespace in a folder called podinfo at the root of my Flux repository:
apiVersion: v1
kind: Namespace
metadata:
  name: podinfo
  labels:
    name: podinfo
I then create a second manifest in that folder called podinfo.yaml, which contains all the necessary manifests for the application itself. This file includes two resources, a HelmRepository defining which Helm repository should be used for pulling the podinfo chart and a HelmRelease which specifies which chart to pull from the repository and what values the release should use.
apiVersion: source.toolkit.fluxcd.io/v1
kind: HelmRepository
metadata:
  name: podinfo
  namespace: podinfo
spec:
  interval: 5m
  url: https://stefanprodan.github.io/podinfo
---
apiVersion: helm.toolkit.fluxcd.io/v2
kind: HelmRelease
metadata:
  name: podinfo
  namespace: podinfo
spec:
  releaseName: podinfo
  chart:
    spec:
      chart: podinfo
      sourceRef:
        kind: HelmRepository
        name: podinfo
  interval: 30m
  install:
    remediation:
      retries: 3
  values:
    redis:
      enabled: true
      repository: public.ecr.aws/docker/library/redis
      tag: 7.0.6
Once those have been defined, I added the necessary kustomize.yaml file that shows Flux which files it should apply;
apiVersion: kustomize.config.k8s.io/v1beta1
kind: Kustomization
resources:
  - namespace.yaml
  - podinfo.yaml
Nearly there, the final thing I added is a podinfo.yaml file in the cluster/my-cool-cluster folder which refers to the previously created folder with all the necessary manifests to create the podinfo application.
apiVersion: kustomize.toolkit.fluxcd.io/v1
kind: Kustomization
metadata:
  name: podinfo
  namespace: flux-system
spec:
  interval: 10m0s
  sourceRef:
    kind: GitRepository
    name: flux-system
  path: ./podinfo/
  prune: true
  wait: true
  timeout: 5m0s
Once everything is up and running, I can test my cluster by port forwarding the podinfo pod to my local machine and accessing localhost:9898.
kubectl port-forward deployment/podinfo --namespace podinfo 9898 9898
Afterthoughts
The main improvement in this setup is the ease-of-use compared to my previous template. Automating the entire process with Terraform and Talos allows for quick adjustments and scaling with minimal manual intervention. Additionally, the setup is significantly faster, with cluster initialization taking less than 5 minutes in my tests. Flux further enhances automation, enabling a fully reproducible and version-controlled infrastructure.
If you’re interested in using my template, the repository with the full code can be found here.