Using Network Policies to Secure Kubernetes Networking
Published on Dec 17
Note: If you want to use a Kubernetes NetworkPolicy, you need to have configured a network provider that supports network policies. Unsure if your cluster supports network policies? Check Kubernetes’ documentation for more information.
I’ve discussed a couple of concepts in Kubernetes on my personal site over the past few months, with workloads being the primary topic. In this post, I want to take a different approach and explore another topic: security.
When running workloads in Kubernetes, they’ll probably need to communicate with each other. To ensure that only specific pods can communicate with each other, you can implement network policies. These policies are a set of rules that specify how pods can communicate with each other, defining what traffic is denied or allowed based on labels, ports, and IP blocks. Enough talking; let’s set up an example and see network policies in action.
The Importance of Having a CNI
Even though NetworkPolicies are a native Kubernetes resource, they require a Container Network Interface (CNI) to function. Applying a NetworkPolicy manifest without a CNI will succeed, but the NetworkPolicy won’t actually work. Most on-premise Kubernetes distributions (k3s, k0s, Talos, etc.) don’t come with a CNI installed, but that can easily be done using a Kubernetes manifest or a Helm chart.
I won’t be going into how you can install a CNI in your cluster, but here are some of the most popular CNIs available:
Setting up a Demo Application
A perfect example for this would be to deploy an application containing a frontend and backend Pod. Since I’m trying to keep it simple, we’ll deploy two “hello-app” containers which will serve as frontend and backend.
To make this application work, we’ll need some communication between the two pods. By default, all communication between pods is enabled, so we should be able to send requests from the frontend to the backend. Let’s try that by creating two Pods with corresponding Services; I have added the YAML manifest below:
apiVersion: v1
kind: Pod
metadata:
  name: frontend
  labels:
    app: frontend
spec:
  containers:
    - name: kuard
      image: gcr.io/kuar-demo/kuard-amd64:blue
      ports:
        - containerPort: 8080
---
apiVersion: v1
kind: Service
metadata:
  name: frontend
spec:
  selector:
    app: frontend
  ports:
    - protocol: TCP
      port: 8080
      targetPort: 8080
---
apiVersion: v1
kind: Pod
metadata:
  name: backend
  labels:
    app: backend
spec:
  containers:
    - name: kuard
      image: gcr.io/kuar-demo/kuard-amd64:blue
      ports:
        - containerPort: 8080
---
apiVersion: v1
kind: Service
metadata:
  name: backend
spec:
  selector:
    app: backend
  ports:
    - protocol: TCP
      port: 8080
      targetPort: 8080
Once you have the manifest on your local machine, deploy it by executing the kubectl apply -f demo-application.yaml command.
[vdeborger@node-01 ~]$ kubectl apply -f demo-application.yaml
pod/frontend created
service/frontend created
pod/backend created
service/backend created

[vdeborger@node-01 ~]$ kubectl get pods
NAME       READY   STATUS    RESTARTS   AGE
backend    1/1     Running   0          57s
frontend   1/1     Running   0          58s
Okay, great, so we have our pods deployed. Let’s launch a shell in the frontend pod so we can verify the connection to the backend pod: kubectl exec --stdin --tty frontend -- /bin/sh. You should now see a shell appear (the prompt looks something like this: ~ $). In this shell, you should be able to access the health endpoint of the backend Pod: wget -q -O- backend:8080/env/api. This command should give you a JSON response with various information.
~ $ wget -q -O- backend:8080/env/api
{"commandLine":["/kuard"],"env":{"FRONTEND_PORT":"tcp://10.109.125.43:8080","FRONTEND_PORT_8080_TCP":"tcp://10.109.125.43:8080","FRONTEND_PORT_8080_TCP_ADDR":"10.109.125.43","FRONTEND_PORT_8080_TCP_PORT":"8080","FRONTEND_PORT_8080_TCP_PROTO":"tcp","FRONTEND_SERVICE_HOST":"10.109.125.43","FRONTEND_SERVICE_PORT":"8080","HOME":"/","HOSTNAME":"backend","KUBERNETES_PORT":"tcp://10.96.0.1:443","KUBERNETES_PORT_443_TCP":"tcp://10.96.0.1:443","KUBERNETES_PORT_443_TCP_ADDR":"10.96.0.1","KUBERNETES_PORT_443_TCP_PORT":"443","KUBERNETES_PORT_443_TCP_PROTO":"tcp","KUBERNETES_SERVICE_HOST":"10.96.0.1","KUBERNETES_SERVICE_PORT":"443","KUBERNETES_SERVICE_PORT_HTTPS":"443","PATH":"/usr/local/sbin:/usr/local/bin:/usr/sbin:/usr/bin:/sbin:/bin"}}
Securing Pod-to-Pod Communications with NetworkPolicy
The output of the previous command confirms what I initially said; by default, Pods can communicate with each other. With this, I mean every Pod can communicate with any Pod in the same namespace. This might not be an issue in development environments, but when working in a production environment, these communications need to be locked down. To achieve this, NetworkPolicies were brought to life.
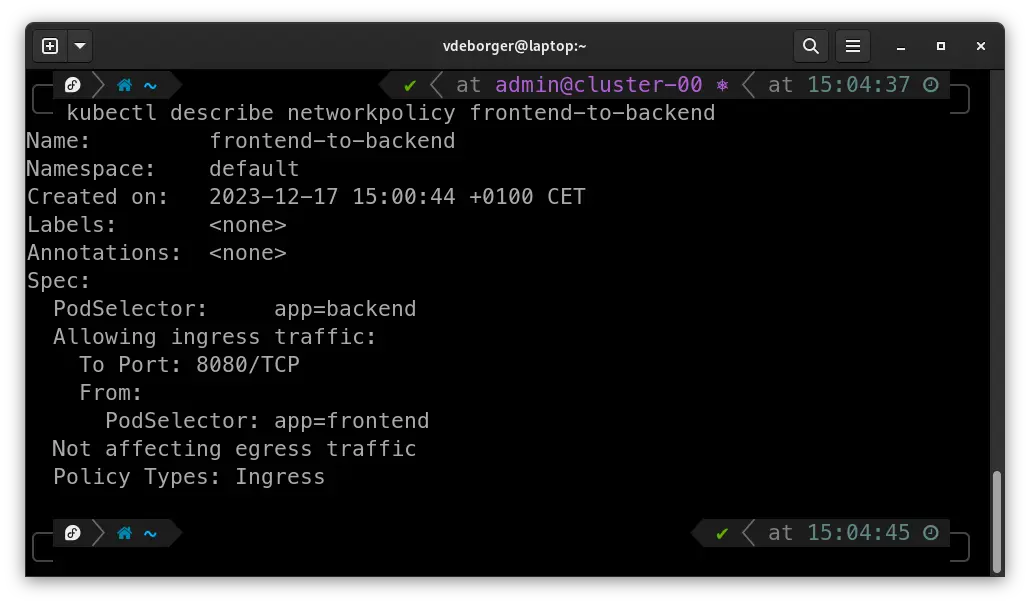
For our application, we’ll create a NetworkPolicy that allows traffic to flow from the frontend Pod to port 8080 on the backend Pod. To do this, we’ll need to create a Kubernetes manifest creating a “NetworkPolicy” resource that defines which Pod can access which Pod on what port. For selecting which Pods can connect to each other, we can use podSelectors. Let’s take a look at an example that allows the frontend to connect to the backend over port 8080.
apiVersion: networking.k8s.io/v1
kind: NetworkPolicy
metadata:
  name: frontend-to-backend
spec:
  podSelector:
    matchLabels:
      app: backend
  ingress:
    - from:
        - podSelector:
            matchLabels:
              app: frontend
      ports:
        - port: 8080
Looking at the manifest, these are some of the most important fields:
-> podSelector: Specifies the pods to which the policy applies. In this example, it selects pods with the label app: backend.
-> ingress: Defines the incoming traffic rules.
-> from: Specifies the sources allowed to connect. In the example above, it allows connections from pods with the label role: frontend.
-> ports: Specifies the allowed ports and protocols. In this case, it allows TCP traffic on port 8080.
After applying that manifest, we’ll see that we’re still able to connect to the backend from the frontend Pod:
[vdeborger@node-01 ~]$ kubectl exec --stdin --tty frontend -- /bin/sh
~ $ wget -q -O- backend:8080/env/api
{"commandLine":["/kuard"],"env":{"BACKEND_PORT":"tcp://10.103.168.228:8080","BACKEND_PORT_8080_TCP":"tcp://10.103.168.228:8080","BACKEND_PORT_8080_TCP_ADDR":"10.103.168.228","BACKEND_PORT_8080_TCP_PORT":"8080","BACKEND_PORT_8080_TCP_PROTO":"tcp","BACKEND_SERVICE_HOST":"10.103.168.228","BACKEND_SERVICE_PORT":"8080","FRONTEND_PORT":"tcp://10.106.83.237:8080","FRONTEND_PORT_8080_TCP":"tcp://10.106.83.237:8080","FRONTEND_PORT_8080_TCP_ADDR":"10.106.83.237","FRONTEND_PORT_8080_TCP_PORT":"8080","FRONTEND_PORT_8080_TCP_PROTO":"tcp","FRONTEND_SERVICE_HOST":"10.106.83.237","FRONTEND_SERVICE_PORT":"8080","HOME":"/","HOSTNAME":"backend","KUBERNETES_PORT":"tcp://10.96.0.1:443","KUBERNETES_PORT_443_TCP":"tcp://10.96.0.1:443","KUBERNETES_PORT_443_TCP_ADDR":"10.96.0.1","KUBERNETES_PORT_443_TCP_PORT":"443","KUBERNETES_PORT_443_TCP_PROTO":"tcp","KUBERNETES_SERVICE_HOST":"10.96.0.1","KUBERNETES_SERVICE_PORT":"443","KUBERNETES_SERVICE_PORT_HTTPS":"443","PATH":"/usr/local/sbin:/usr/local/bin:/usr/sbin:/usr/bin:/sbin:/bin"}}
Executing that same command from a different Pod, using the kubectl run command, for example, you’ll see that the connection fails (which is exactly what we want):
[vdeborger@node-01 ~]$ kubectl run -i --tty net-policy-test --rm --image=busybox:latest --restart=Never -- /bin/sh
~ $ wget -T 10 -q -O- backend:8080/env/api # the "-T" argument sets the timeout; the default value for this argument is 15 minutes...
wget: download timed out
Awesome, this means that we’ve successfully secured the Pod-to-Pod communications. This, however, isn’t the only thing we can do with NetworkPolicies. NetworkPolicies can control traffic in and out of our cluster, between namespaces, etc. A great resource that can be used to create NetworkPolicies is the Network Policy Editor, which provides a web interface in which you can interactively create policies.
You can also find some great examples in this GitHub repository!